Showing posts with label Bread. Show all posts

Saturday, March 23, 2013

Irish Soda Bread

Yes! It is official! I am addicted to the Joy of Baking youtube videos! :)

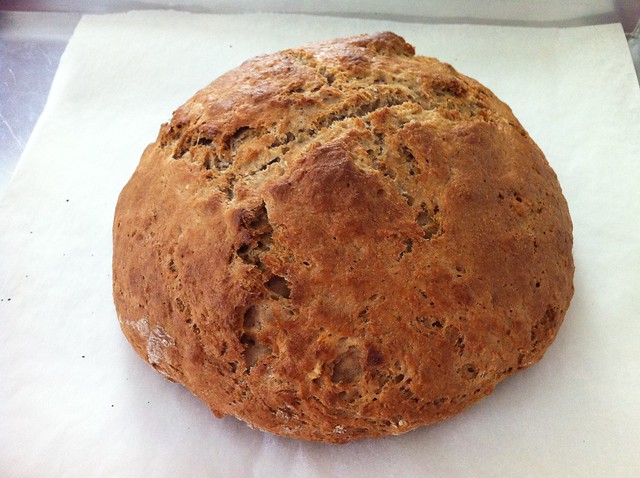
This time, I decided to try my hands at making the Irish soda bread and it was a triumphant success! From preparation of the ingredients to having the piping hot loaf right in front of me, it took no more than an hour.

The bread has a crispy crust on the day of baking and there is also a tinge of sweetness in every bite.

I highly recommend this recipe for the ever-so-busy individual who loves the wholesome homemade bread loaf but couldn't afford the time required in most bread recipes which requires the proofing of the dough.

Wednesday, February 13, 2013

Cinnamon Roll

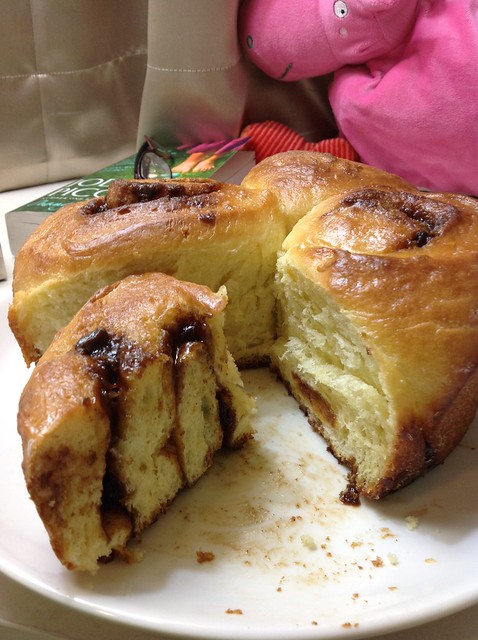
Having had success with the Chocolate Swiss Roll recipe, I adapted yet another recipe off the Joy of Baking website.


Once again, with the foolproof step-by-step tutorial from the website, it's oh-so-easy to bake fresh cinnamons in the morning for breakfast!

p.s. my kitchen is still wafting the nice cinnamon aroma from this morning's new cinnamon roll batch.

Tuesday, September 4, 2012

Victorian Milk Bread

I learnt to bake bread a few years back and attempted the Victorian milk bread a couple of times by manually kneading the dough but without success. A few years later, after finally owning my own stand mixer, I decided to make another attempt on this bread.

Victorian Milk Bread
 
Ingredients:
2 tsp dried yeast (add some milk to it)
1 tsp salt
300g milk
500g bread flour (sieved)
1.5 tbs sugar
 
 
Method:
(1) Make a well in the flour
(2) Put in salt first followed by some milk. Mix flour in and add milk slowly while mixing flour in.
(3) Halfway through, add in the yeast
(4) Continue to add remaining milk while kneading the dough by hand or by machine
(5) Add sugar
(6) Dough will be wet initially and it is also the indication that the dough requires more kneading. The dough is ready when it doesn't stick to the fingers.
(7) Cover with plastic foil and leave to raise for an hour
(8) Grease a baking tin
(9) Put the dough in the baking tin, cover with a damp cloth and leave it to proof for another 30 minutes
(10) Bake at 200°C for approximately 20 minutes
(11) When the bread is almost done, reduce the oven temperature to 180°C and bake for a few more minutes
 
 
Tips:
* Put dough in a small bowl if you want to yield a bigger dough after proofing
* Yeast need sugar to react, therefore, add sugar last and slowly to the yeast
 
 
Verdict:
(+) Easy recipe for beginners
 
(-) Without the use of a stand mixer, it can be pretty tedious when manually kneading the dough
 
(=) Due to the high humidity in Singapore, the bread does not keep as long as in temperate countries. (=) It can at best be kept for 2 days with the same bread texture and taste
(=) Nevertheless, it is best eaten on the same day!

Monday, February 27, 2012

Baker & Cook

This newly opened and incredibly successful bakery is located in one of the shophouses along Hillcrest Road, within the vicinity of the Raffles Girls' Primary School and nestled amongst the private residential houses of Bukit Timah.

I only got to know of this bakery from The Life! section of The Sunday Times newspaper and I was already excited from reading about it. The next instinct was to pull THE husband and baby out of the house and while they were making themselves comfortable in the car, I was already madly jabbing in the address of the bakery on the GPS.

Upon arrival, there was already a short queue forming at the counter. The aroma of the freshly baked goods was simply irresistible and the place was almost fully seated. While I made a beeline dash for the queue, THE huband and baby set upon themselves the mission of securing a table and chairs.

I ordered a couple of mini French baguettes for myself and THE baby while THE husband tried the blueberry tart.

The blueberry tart was OK I guess since THE husband never ordered it the second time we were there.

However, the mini-baguettes were fantastic! Fresh out of the oven, the crust was crispy and the bread soft and warm inside. I like mine with a thin spread of butter and a sprinkle of sugar. The chewy loaf also had THE baby occupied which is definitely a good thing!

Since the first visit, we were back almost on a weekly basis to get our regular supply of baguettes and walnut bread loaf.

However, it should be noted that the baguette might be a little too 'hard' for the local's preference, having been used to soft bread, the likes of Gardenia. And it is best consumed within the same day or at most the very next morning. Good news is, the walnut loaf has proven to be able to last a few days more.

Wednesday, May 19, 2010

You Shall Be Missed

Over the months, I have grown to love Austrian breads, pastries and cakes.

The regular toast or sandwich breads readily available in Singapore are somewhat a rare sight here. In it's place are bread loaves which comes in a great variety such as white bread, wholemeal bread, sour dough bread(vollkorn), dark brown rye bread(schwarzbrot), muesli bread, yoghurt bread and many many more!

plain white semmel bread
vollkorn bread

The local's preference for cakes and pastries differs quite abit from Singaporean's as well. While different varieties of cheesecakes, tarts and thick chocolate cakes are usually spotted at cafes or bakeries in Singapore, quite a fair portion of pastries found in Austria are made with seasonal fruits like raspberries, blueberries, strawberries etc.
Another flavour not found in Singapore is the mohn cakes which are essentially poppy seed cakes. I really enjoyed it but sometimes, I can't help wondering if I really like the cake or whether I am simply 'addicted' to it.

A traditional local flavourite would be Schaumrolle. This is a very light pastry with puff pastry rolled to form a tube and the hollow in the center filled up with meringue (sugared whipped egg white). It can be quite a mess to bite into one but nevertheless, a hit during open-air events especially the annual Christmas markets.
The list is endless and I could sit here for hours blabbering away or I could go out right now and grab myself some tasty munchies before the shop closes for the day! :)

Wednesday, April 21, 2010

Chocolate Cinnamon Monkey Bread

The name sounds like a teaser while it's appearance posed somewhat a challenge to me. Hence, without much thought, I headed to the supermarket to purchase all the required ingredients and literally jumped straight into the baking of this unconventional, strange-looking bread.

Chocolate Cinnamon Monkey Bread

Ingredients (dough):
30g softened unsalted butter
30g melted unsalted butter
1 cup warm milk
1/3 cup warm water
1/4 cup granulated sugar
2 1/4 tsp instant yeast
3 1/4 cups plain flour + extra for work surface
2 tsp salt (I used salted butter so I reduced the quantity to 1 tsp)
1 tbs oil

Ingredients (filling):
100g dark baking chocolate
2/3 tsp ground cinnamon

Ingredients (coating):
1 1/2 cup light brown sugar
3 tsp ground cinnamon
100g unsalted butter


Method (dough):
(1) Adjust the oven rack to medium-low position and heat the oven to 100°C. Once the oven reaches the desired temperature, turn it off.

(2) Coat all sides of the bundt pan with the softened butter. Set aside.

(3) Mix the milk, water, melted butter, sugar and yeast in a cup.

(4) Mix the flour and salt in a large bowl.

(5) Make a well in the centre of the bowl and pour in the milk mixture.

(6) Using a wooden spoon, incorporate all the ingredients till a dough is formed.

(7) Turn the dough out onto a lightly floured work surface and knead for about 10 minutes until the dough is smooth and non-sticky.

(8) Coat the bowl with oil prior to placing the dough in it. Coat the surface of the dough with oil as well. Cover the bowl with a plastic wrap and place in the warm oven till it doubles in size. Takes approximately an hour.

Method (filling):
(1) Melt the dark chocolate.

(2) Add the ground cinnamon into the melted chocolate and mix well. Place the mixture in the refrigerator to harden it.

(3) Once the chocolate-cinnamon mixture is hardened (approximately 30 minutes), chop it into small pieces with a knife.


Method (coating):
(1) To brown the butter, heat it at medium-high heat in a saucepan. Once the butter turns light brown, remove it at once from the heat.

(2) Mix the brown sugar and cinnamon together in a bowl. Set aside.


Method (assembly):
(1) Remove the risen dough from the oven and bowl. Shape it into a large 8" x 8" square and divide the square into 64 equal pieces using a knife.

(2) Meanwhile, heat up the oven to 100°C and turn it off once the temperature is reached.

(3) Flatten each piece slightly and place some pieces of the chocolate-cinnamon mixture in the centre of the dough. Nip the edges together and roll it into a ball.

(4) Dip each dough ball first into the melted browned butter before rolling it in the bowl of brown sugar-cinnamon mixture.

(5) Place each dough ball in the buttered bundt pan and stack the balls next to each other leaving no gap.

(6) Place the bundt pan in the warmed oven for another hour. This is to proof the dough a second time until the dough balls are approximately an inch below the rim. Remove from the oven.

(7) Preheat the oven to 180°C and bake for ~ 30-35 minutes.

(8) Remove from the oven and cool for not more than 5 minutes before turning it out from the bundt pan.


Verdict:
(-) This recipe yields a very sweet bread - sweet on both the outside and the inside! Too sweet for my liking.
(-) Some suggestions to reduce the sugar level would be to use fine brown sugar and only coat the dough balls sparsely with it. Might also be an alternative to do away with the chocolate filling totally.
(-) Do not leave the monkey bread uncovered overnight as it'll turn quite hard by the following morning - as in my case. :(

(+) Although there are quite a number of steps, nevertheless, if you were to abide by these steps faithfully, I'm quite sure you'll end up with this interesting-looking bread to add to your baking book of conquest!

(=) Best to bake and finish this bread on the very same day! As such, it would be quite a good idea to make it for a children's party where all the kids would be busy nipping away at the small pieces of bread.

Tuesday, April 6, 2010

B is for Bread

I knew that I am in 'ang moh' terrritories the moment I am confronted with a vast selection of breads for breakfast.

Since I am in the midst of a food transition having just spent five wonderful weeks loading up on my calories in Singapore, I opted for the wholemeal tuna sandwich which is still a familiar and welcome sight for the Singaporeans. My companion, nevertheless, easily washed down the vollkornbrot ham sandwich with a cup of coffee - typical European style.

I am not complaining about the breads since I have grown to appreciate and enjoy them over the months.

Although the toasted white bread with kaya spread served in the kopitiams in Singapore has it's 'umph" factor, it simply cannot replace the daily freshly baked crispy crusted bread loaves in Europe. And certainly, vice versa.

To buy such a bread loaf in Singapore means having to travel to German bakeries and paying twice the price in Singapore dollars...which can be a killjoy.

For sure, this is one thing that I'll miss sorely when I'm back in Asia.

Monday, July 20, 2009

Weisskirchen - Food and Sights

Spent a relaxing weekend at the small town of Weisskirchen, Steiermark. It is summer now, sometimes at a scorching afternoon high of 35°C.

It is also the mushroom season and interestingly, I was informed that there is a local regulation stating that each person can only harvest a certain quantity of mushroom from the forest. With that, I decided to try my luck hunting for mushrooms in the nearby forest.

I'm lucky enough to spot some mushrooms but unfortunately, they were either poisonous or already half-eaten by insects.

Along the way, I also found some wild blue berries growing from the bushes but they were extremely sour to the taste. So much for having absolute zero patience and being a glutton.

Summer here is for a relatively short period of time compared to winter. So while it's here, everyone's taking the opportunity to enjoy the sun, buzzing insects and the bright colours that nature brings along with it - the white, white clouds, the blue, blue sky, the green, green trees, the red, red flowers and the brown, brown wheat harvest.

And of course, the Austrian cows which are a fantastically, photogenic bunch. :)

I also had the luxury of enjoying home-cooked Austrian food which were simply delectable!

Faschierte Laibchen mit Kartoffel puree
(Oven roasted meatloaf with mashed potato)

Fritattensuppe
(Pancake slices in beef broth - my all-time favourite)

Pistazien Kuchen
(Pistachio Cake)
Nuss Strudel
(Bread with nut fillings)

Monday, March 23, 2009

Banana Walnut Bread


Ingredients:

1 cup (115g) walnuts, toasted and coarsely chopped
1-3/4 cup (245g) plain or top flour
3/4 cup (150g) granulated brown sugar
1 teaspoon baking powder
1/4 teaspoon baking soda
1/4 teaspoon salt
1 teaspoon ground cinnamon
2 large eggs
1/2 cup (113g) unsalted butter, melted and cooled
3 ripe bananas (about 1lbs or 454 grams), mashed well
1 teaspoon pure vanilla extract

Steps:
1. Preheat oven to 350F (180C) and place oven rack to middle position, Butter and flour the bottom and sides of a 9x5x3 inch (23x13x8cm) loaf pan. Set aside
2. Place the nuts on a baking sheet and bake for about 8-10 minutes or until lightly toasted. Let cool and then chop.
3. In a large bowl combine the flour, sugar, baking powder, baking soda, sat, cinnamon, nuts. Set aside.
4. In a medium bowl combine the mashed banana, eggs, melted butter and vanilla.
5. With a rubber spatula or wooden spoon, lightly fold the wet ingredients (banana mixture) into the dry ingredients just until combined and the batter is thick and chunky. (the important thing is not to over mix the batter. You do not want it smooth. Over mixing will yield tough rubbery bread)
6. Scrape batter into prepared pan and bake until bread is golden brown and a toothpick inserted in the center comes out clean, about 55-60 minutes. Place on a wire rack to cool and then remove the bread from the pan.
7. Serve warm or at room temperature. This bread can be frozen and microwave before serving.

Verdict:
1. Top flour makes a much finer bread.
2. This recipe makes a rather cake-like bread, so don't be surprised.
3. Make sure you get very ripened bananas to give it that extra fragrance when baked. unripe or just ripened bananas just doesn't cut it.