Wednesday, February 13, 2013

Cakes from Yamazaki Boulangerie Chaude

Chanced upon this bakery at Tampines 1 while looking for cakes. I found out that Yamazaki Boulangerie Chaude belongs to the same company that runs the Sun Moulin Bakery at Scotts Isetan. The looks of the cakes looked inviting enough and I bought some for my afternoon tea today!

Cinnamon Roll

Having had success with the Chocolate Swiss Roll recipe, I adapted yet another recipe off the Joy of Baking website.


Once again, with the foolproof step-by-step tutorial from the website, it's oh-so-easy to bake fresh cinnamons in the morning for breakfast!

p.s. my kitchen is still wafting the nice cinnamon aroma from this morning's new cinnamon roll batch.

Happy Snake Year! 蛇年快乐!

It is that time of the year again where everyone has an excuse to load the calories and go on a binging spree.

Previously, I was happy to receive ang baos and now, I am happy to be giving ang baos to children! Very much alike to Chrismas, the Chinese New Year is all about giving, receiving, eating and most importantly, reuniting with your loved ones.

 
新年快乐!
身体健康!
心想事成!


Chocolate Swiss Roll

I finally found the peeerfect swiss roll recipe where the cake layer is not too hard and it rolls easily without cracking up too much!

I adapted the recipe off the Joy of Baking website. There is even a video that shows you a step-by-step approach on how to re-create the recipe in your own kitchen.


Although the website termed it Chocolate Sponge Cake, it is actually a chocolate mousse recipe that doesn't require flour or butter. The chocolate mousse layer is then assembled like a swiss roll with raspberry flavoured whipped cream.

I would personally recommend to reduce the amount of sugar used in the recipe. Nevertheless, the recipe yields a melt-in-your-mouth swiss roll where the main calories comes from the cream filling. So if you have a sweet tooth and yet is trying to watch that waistline of yours (yes, I agree. Life is complicated!), then go easy on the cream filling. :)

Raspberry Crunch Cake

I adapted this recipe off The Sunday Times - Life! section.

 
Raspberry Crunch Cake
 
 
Ingredients:
130g butter
150g caster sugar
2 eggs
250g self-raising flour (sifted)
120ml milk
250g fresh raspberries
 
Crunchy Top:
130g flour
100g brown sugar
125g chopped butter
50g chopped almond (I used almond slices instead)
 
Method:
(1) Grease a 22cm diameter baking tin, lining the bottom with baking paper. Preheat the oven at 180°C.
(2) Prepare the crunchy top by rubbing the flour, butter and brown sugar together in a bowl until it resembles coarse breadcrubs. Set aside.
(3) For the cake, beat the butter and sugar together until light and fluffy.
(4) Add the eggs one at a time, beating to mix them in.
(5) Continue beating while adding the sifted flour and the milk a little at a time. The mixture should look like a thick batter.
(6) Pour the cake mixture into the prepared baking tin and sprinkle the raspberries on top, slightly pressing them into the cake batter.
(7) Sprinkle the crunchy topping evenly over the raspberries
(8) Lastly, scatter the almonds across the top.
(9) Bake in the oven for about 50 minutes or until a knife inserted into the cake comes out clean.
 
Verdict:
(+) Simply ingredients and very easy to make
(-) This cake is a little too heavy for my liking
(=) It is more suitable for serving on the same day to a group of about 8-10 people otherwise the top would lose it's crunchiness overnight.


Cornflake Cookies

I adapted this cookie recipe off the Food4Tots blog site.

This used to be my favourite Chinese New Year cookies when I was young and didn't care much about the waistline. :)

This recipe yields a flaky cookie which is easy to eat and would surely be an instant hit with young children!

Paddington House of Pancakes

I found this awesome restaurant at City Square Mall in October 2012 - Paddington House of Pancakes.

The Husband and I were exploring the shopping mall when we chanced upon this newly opened restaurant back then. They have a rather huge selection of pancakes on the menu and we were at a lost on what to order. Having spent a good 15 minutes narrowing down our selection to just ONE type of pancake, we were informed by the waitress that since the restaurant had just opened, they were only able to serve us limited varieties off the menu. Oh well....

We opted for the simple blueberry pancakes topped with a scoop of ice cream. While waiting for the pancakes to be served, I was kind of complaining to The Husband about the price they are charging ($9 - $10) us for something so simple.

When the pancakes were served, it was nicely presented with a scoop of vanilla ice cream on top of three thick pancakes, one stacked on top of the other. I was skeptical at first until I took my first bite and was rocketed off to to gourmet heaven straight away!

How could something so simple taste so delicious!?!?!? It was soft, light and warm with a pleasant vanilla aftertaste lingering in the mouth.

It's official - they should change the restaurant name to "God of Pancakes"!


Oatmeal Rasin Cashew Nut Cookies

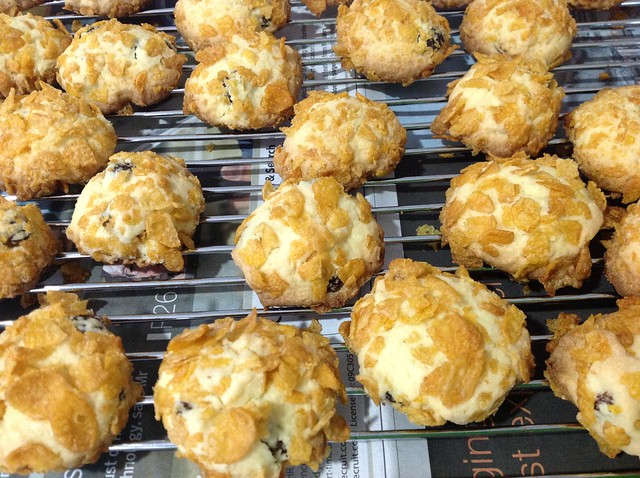
Oatmeal Rasin Chocolate Cookies

Ingredients:
150g plain flour
½ tsp baking soda
½ tsp salt
125g unsalted butter
80g light brown sugar
30g castor sugar
1 egg (room temperature)
¼ tsp vanilla extract
100g rolled oats
100g raisins
120g plain cashew nuts
Semi-sweet chocolate chips (optional, amount depending on preference)
 
 
Method:
(1) Prepare the raisins by adding water to a bowl and draining it immediately. Leave it to air in room temperature for about 2-3 hours. Pat dry the raisins before adding them into the cookie batter.
(2) Roast the cashew nuts in the oven at 180°C for a few minutes until it turns light brown. Chop the nuts to small bits.
(3) In a mixing bowl, whisk the plain flour and baking soda. Sieve the mixture and add salt. Set aside.
(4) Let the butter soften at room temperature in a separate mixing bowl.
(5) With an electric mixer, beat the butter at medium speed till smooth and creamy.
(6) Add in both types of sugar and continue to mix until the mixture becomes pale and fluffy.
(7) Add the egg and vanilla essence. Beat well.
(8) Add the flour mixture in batches of 2 or 3 to the creamed mixture using a spatula in a cutting and scraping motion.
(9) Stir in the raisins, cashew nuts, chocolate chips and oats. Mix well.
(10) Preheat the oven to 180°C.
(11) Drop the cookie batter onto the baking sheet and slightly flatten them with a spoon.
(12) Bake for approximately 12 minutes until the edges are light golden brown with the tops appearing to be a little under-cooked.
(13) Off the power to the oven and let the cookies sit in the oven for a further 2-3 minutes.
(14) Remove the cookies from the oven and let it cool for a few minutes on the baking sheet before transfering them to cool off further on a wire rack.
(15) Be sure to store them in an air tight container.
 
Verdict:
(+) Relatively easy to make with little baking skills required.
(-) The cookies were crispy on the day I baked it but turned soft on the next day. I do hope it's due to the container that I had used to store it.
(=) Would be a fun activity to do with your young one on a rainy day!


Philip Turns Two!

Philip turned two on 21 July 2012 and since he is more aware of the happenings around him, we decided to throw him a mini-party at the childcare centre.

The night before, The Husband and I spent a good one hour wrapping goodie bags for the entire class. With the cake in the fridge, we were ready to go!

The next day, when we walked into the classroom with the big box of cake and big sack of goodie bags, we caught Philip by surprise and the mood in the classroom was simply electrifying!

The children were at first trying to peer into the box containing the cake and there were sounds of "Wow!!!" coming from the slightly taller kids who managed to catch a glimpse on their tip toes.

Apparently, the children were very well 'trained' in birthday celebrations what with almost one birthday celebration in the classroom per month.

The celebration took merely 30 minutes but the smiles on the faces of all the children are absolutely priceless!


Tuesday, February 12, 2013

Pan-Fried Salmon

This is an easy to make yet delicious and nutritious meal for the whole family.
 
Pan-Fried Salmon
 
 
Ingredients:
Salmon
Salt
Pepper
Olive Oil
Lemon
 
 
Method:
(1) Make a few cuts on the skin of the salmon
(2) To both sides of the salmon, season with a dash of salt, pepper and lemon zest
(3) Refrigerate for at least an hour
(4) Add olive oil to the frying pan
(5) Put the skin side of the salmon on to the pan (skin facing pan)
(6) Once half of the salmon is cooked (you can easily see it from the side profile of the salmon), flip it to cook on the other side. Do not flip the salmon too early or else the skin would stick to the pan.
(7) Once the salmon is cooked, serve it on a plate with other accompanying side dishes - such as potato salad or mashed potato or blanched broccoli and carrots
 
Verdict:
(+) Time saving
(+) Simple ingredients
(=) A hard-to-fail dish 

Project Gardening

It's been quite some months since I last posted in this blog. Besides being busy with the usual work-home routine, I have also undertaken project Gardening!

I am not sure when I started developing this new hobby of mine. Perhaps I just wanted to 'fluff up' the balcony and also put my fingers to the green test.

I started with the basil plant and within weeks, I not only successfully propagated them but also expanded from one plant to four plants! Encouraged by the success, I proceeded to undertake more challenges like the strawberry plant, lime plant and some flowering plants as well.


The plants flourished for some weeks but slowly began withering one by one there after. For some plants, like the basil and lime plant, I started observing white cottony spots on the underside of the leaves. Upon querying with a friend and a search in the ever-knowlegeable Google, I finally found the culprit - Mealybugs! One of the treatments would be the application of white oil on the leaves to kill these bugs. There was a brief success but soon after, the plants were colonized by a fresh batch of bugs. The rate of colonization and reproduction by these bugs won me hands down. I finally surrendered and had to dispose off the diseased plants. :(

As for the flowering plants, it took me three to four pots before I realised that they need to be placed in a shady location. The Husband, in addition, provided his 'expertise' opinion that I overwatered them. Lesson learned! :(

So what is left on my balcony, you may ask. From a flourishing population of nine pots, I have reduced the number drastically to the current four pots - aloe vera, pandan, grape plant and the celosia. With the exception of the grape plant, the remaining three are known to be hardy plants which will probably take "The Finger of Death" to murder them all - which I hope I do not have.

Regardless of the numerous failures, the interest is still strong within and I'll be sure to go plant hunting soon! :)