Thursday, April 29, 2010

Mmmmm....MoMos

Ever experience the sudden craving for a particular food the moment you open your eyes in the morning? With the craving monster persistently wounding it's long coiling fingers around you throughout the day and no amount of delicacies good enough to drive it away - this can indeed be rather tormenting!

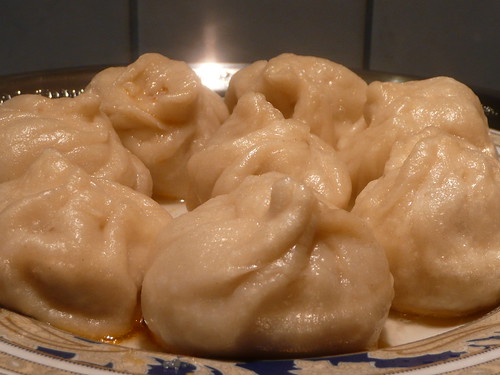
That was exactly what I experienced when I suddenly developed a terrible craving for momos at 7am in the morning. To make matters worse, there is not even the remotest possibility of me getting hold of one such Nepali meat dumpling in the small town of Villach. Absolutely ZERO!

I was so close to compromising my momo cravings with the local chinese dumplings until my fingers unknowingly keyed in "Nepali momo recipe" in the Google search engine. And praise the founders of Google! I found so many recipes for momos ranging from complicated ones with the use of numerous exotic spices to the simple ones where the ingredients are easily available in the local supermarkets!

I combined a few of the simple recipes and came up with one of my very own! Who knows, maybe I might even be able to help save some unfortunate souls who are also being tormented by the momos craving monster?!?

Meat MoMos

Ingredients:
2 cups plain flour
3/4 cup water
500g minced meat (meat of your choice)
1 medium onion
a few cloves of garlic
1 slice of ginger
1 1/2tsp salt
dash of pepper
dash of cumin powder
dash of chilli or hot paprika powder
sesame oil


Method:
(1) Dice the onion, garlic and ginger.

(2) In a bowl, combine the diced onion, garlic and ginger with the minced meat, salt, pepper, cumin powder and chilli powder.

(3) Lastly, add the sesame oil and mix well. Set aside.

(4) To make the momo skin, slowly add the water to a bowl of flour until a smooth dough is formed.

(5) On a lightly floured work surface, knead the dough for a few minutes. Leave the dough to rest in the bowl for ~30 minutes with a wet cloth covering the bowl. This prevents the dough from drying out.

(6) Pinch the dough into similar sized dough balls. The size depends on how big or small you want your momos to be.

(7) With a rolling pin, roll out each dough ball into flat circular dough skins. Roll as flat as possible otherwise you would end up with thick-skinned momos after steaming.

(8) Assemble the dumplings as shown in the video below:


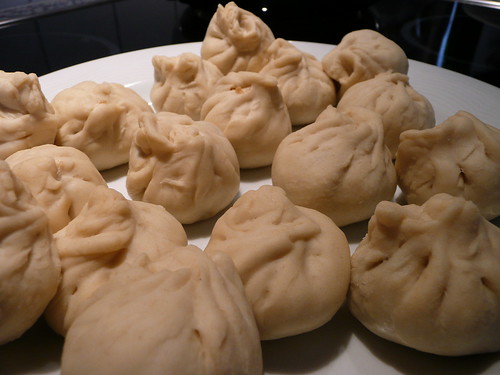
(9) Coat the steamer plate with a thin layer of oil to prevent the momos from sticking onto the plate.

(10) Steam for ~15 minutes or until the momos are cooked.

(11) Serve hot with sauce of your choice!


Verdict:
(+) Relatively easy recipe to follow through which yields reasonably tasting momos.

(-) Flattening the little dough balls and assembling them into decent looking momos can be quite a feat!
(-) When biting into the momos, the meat fillings easily fell out as a whole chunk, separate from the momo skin. This was different from the ones I had in Nepal where the meat fillings are scattered within the skin.

(=) Quite a good first attempt. Will be motivated to make it a second time!

Tuesday, April 27, 2010

Semmelknödel with Schinken in RindSuppe

I was never a fan of knödel, of any kind, to begin with. So to be honest, I was not especially thrilled to be presented with 5 knödels on a fine Sunday afternoon. The knödels I received were essentially bread dumplings with bits of hams incorporated in it.

After having lazed around for most part of the Sunday, I decided to finish up these dumplings on the very same day, served in a beef-based soup for a light dinner - the traditional Austrian way.

The preparation was simple with the dethawing of the frozen dumplings, heating up of the soup and finally throwing the dumplings into the boiling soup. The soup was then garnished with some chopped chives before serving.

And guess what?!?! I liked it! I really, honestly enjoyed it!

Thumbs-up to Werner for a job well done! :)

Creamy Strawberry Cake

The story unfolds with a recipe for a creamy strawberry swiss roll. However, due to the unfortunate absence of a square or rectangular baking pan, I proceeded with a bundt pan instead.

The recipe yielded enough batter for two round cake bases. Armed with my 'creativity', I proceeded to trim off the four sides of the round cake base to yield a perfect square. However, after applying the first layer of whipped cream and strawberry chunks, I realised that the length of the cake base was far too short and the layer too thick to be rolled into a roll.

So with my never-giving-up spirit, I decided to stack the second piece of cake base on it and tried to craft it into a regular square cake instead. The irony of it all - I could have saved the effort of having to trim away the four edges in the very first place where I would have ended up with a regular round cake as well!

With 2 cups of whipping cream as stated in the recipe, I ended up with so much cream which I tried desperately to smear all over the two pathetically thin cake bases. Even then, there was still some leftover cream which I had to dispose of. :(

This would have to be the creamiest cake I ever tasted... any more cream and it would only be cream left! :)

Creamy Strawberry Cake
(recipe modified based on above experience)

Ingredients:
150g cake flour, sifted (I used plain flour since cake flour was not available)
4 eggs
100g + 1/2 cup granulated sugar
2 drops red syrup (optional)
1/2 tsp strawberry essence (optional)
1 to 1 1/2 cups whipping cream
1 cup fresh strawberries, diced


Method:
(1) Preheat the oven to 180°C.

(2) Line the bundt pan with parchment paper.

(3) Whisk the eggs until frothy and add in 100g sugar slowly. Continue whisking till stiff peaks form.

(4) Add the essence and colouring. Mix till well combined.

(5) Fold the flour slowly into the egg mixture.

(6) Pour the mixture into the pan and bake for ~15 minutes or until it is cooked with a springy texture.

(7) Remove from the oven, trim the crusty edges and slice the cake into two equally thick round bases.

(8) Allow the cake to cool before spreading the fillings.

(9) Meanwhile, whisk the whipping cream together with 1/2 cup sugar till stiff peaks form. Refrigerate the whipped cream until ready for use.

(10) Wash and dice the strawberries. Set aside.

(11) Spread the cream over the first cake base before evenly sprinkling the diced strawberries over it. Be generous with the fruits.

(12) Spread a thin layer of cream to slightly cover the strawberries.

(13) Place the second layer of cake base on the cream layer and proceed to spread cream all over the cake.

(14) You may wish to decorate the cake with whole strawberries.

(15) Chill the cake before serving.


Verdict:
(-) For step (3), I could only achieve a frothy mixture instead of stiff peaks no matter how long I whisked the eggs.
(-) The cake bases were not as soft as I would like it to be.
(-) Without a layer of gelatine coating on the strawberry decorations, the fruits could not keep fresh or survive for long in the refrigerator.

(+) A relatively healthy cake base recipe without the addition of butter or oil!

(=) The cake tastes good if not for the excessive cream applied. :P

Paper-Thin Crepes

Snipped this recipe off The Sunday Times a while back and if not for the new crepe pan addition, it would probably have stayed in my recipe book for quite some time before seeing any daylights again.

Crepes

Ingredients (makes 6 - 7 crepes):
200g plain flour
20g sugar
pinch of salt
3 eggs
300ml milk
50ml water
10g butter, melted


Method:
(1) Place the flour, sugar, salt and eggs in a big bowl.

(2) Whisk the content in the big bowl while gradually pouring in the milk and water to achieve a smooth batter.

(3) Stir in the melted butter until incorporated.

(4) Refrigerate the batter for an hour before use.

(5) Heat the crepe pan until it is hot.

(6) Pour in approximately 70ml of batter (for a 25cm crepe pan), remove the pan off the heat and swirl it around to evenly distribute the batter so that it coats the entire pan.

(7) Return the pan to the heat and cook till the edges starts to brown slightly and peel from the side of the pan.

(8) Run a spatula around the edges of the crepe to free it from the pan and when the underside of the crepe has turned a light golden brown, flip it over.

(9) Repeat setp (8) for the other side and once cooked, serve it warm with ice-cream or any toppings of your choice!


Verdict:
(=) Guaranteed to yield yummy paper-thin crepes!

Sunday, April 25, 2010

Bled @ Slovenia

My first visit to Bled was in the Summer of 2004. The memories were vivid with the warm sun beaming down on makeshift stalls setup all around the calm lake. Colourful wild flowers were blooming on the grass plain with bees humming near pots of golden honey on sale.


Almost six years later, I decided to make a return trip to try to relive the wonderful memories I always have for the place.

The trip took us no more than 45 minutes and since Slovenia is part of the European Union, no passport check is required at the border.

The weather report promised a sunny Saturday afternoon but when we arrived in the morning, the sun was still hidden behind the clouds accompanied by the occasional gusts of wind. Nevertheless, with the beginning of Spring, wedding bells were ringing in the air, cafés were opened for business around the lake, strollers were busy licking away at their huge ice-cream cones and the ducks and swans were out begging for treats of bread crumbs or lazily napping away.
For me, I chose to take in the grand view of the lake with a nice warm cup of hot chocolate in hand. And just when I thought that hot chocolates tastes the same, I was in for quite a shock when I had mine served. It was rather thick and the first sip revealed a bitter sweet after-taste with a slight tinge of herbal flavor to it. My guess would be that melted chocolate was used instead of chocolate powder. But still, the herbal taste remains very much a mystery to me.

The town of Bled is rather small with most of the main shops lined along one main street. Besides the lake, the other not-to-be-missed 'attraction' in Bled - *drum roll* - would have to be Casino Bled. I find this to be a rather amusing name for a casino because for a casino to bleed would mean for the gamblers to win! But then again, it might take on the alternative meaning of bleeding the gamblers dry instead.
It was a pity that we came a week too early because on the following weekend, there is to be a rowing competition held in Bled. Nevertheless, we could see the laying down of the race routes with flotations on the lake and some teams were already training hard for the big day.
I only realised on this trip that cream cake is a speciality of Bled and Hotel Park was where the cake originated from.
Quoting the introductory poster outside the hotel:

"...kneaded butter-based pastry dough which he folded seven times and left to rest until the next morning when he baked it and let it to cool. Next, he mixed up the best natural ingredients into a fine egg-based cream and left it to simmer for exactly seven minutes, stirring occasionally. Then he added firmly whipped egg whites to the hot cream and poured the yolks onto a thin layer of baked dough. Once the cream was completely cool he garnished it with a layer of whipped cream and covered it with another layer of the butter-based dough. He finished the dessert off with a generous layer of icing sugar and cut the cake into 60 pieces, each 7 x 7 cm..."

So the secret recipe lies in the number SEVEN....ohhhhh....now we know... :)

I only purchased one slice for takeaway because I honestly thought that it would simply be a cake laddled with thick, fattening cream. It was only when I brought it out from the refrigerator the very same evening and had my teeth sink into the first bite that I knew instantly I was very much mistaken! The cream was so light and not as sweet as I thought it would be. Perhaps due to the refrigeration, the cream tasted a little like ice-cream too! So now you know this is a must-try in Bled!

We ended the trip with lunch was at a traditional Slovenian restaurant, recommended by the local tourist information centre. It was just a short drive from the lake and we were the first customer of the day. We ordered a simple mix salad to share and a main dish each comprising of the traditional Slovenian-style grilled fish and cream chicken breast with safron rice.

This is the second time I ordered fish in Europe with both the head and tail served complete. It was cheaper (cost less than €10) and tasted much better than the one I had in Klagenfurt. At least they removed all the scales on the fish so I was able to enjoy the crispy fish skin. :)

The safron rice was quite a disappointment as the rice was a little on the soft side. But I guess this might be the way the locals like it done as compared to the asians's preference.

The most astounding of all would be the simple looking bowl of mix salad. The combination of vegetables with the right seasoning gave it a very refreshing bite! I could easily woof down the entire serving with no help rendered!
All in all, this was a nice trip down memory lane - with new memories created but never replacing or recreating the old ones.

Wednesday, April 21, 2010

Chocolate Cinnamon Monkey Bread

The name sounds like a teaser while it's appearance posed somewhat a challenge to me. Hence, without much thought, I headed to the supermarket to purchase all the required ingredients and literally jumped straight into the baking of this unconventional, strange-looking bread.

Chocolate Cinnamon Monkey Bread

Ingredients (dough):
30g softened unsalted butter
30g melted unsalted butter
1 cup warm milk
1/3 cup warm water
1/4 cup granulated sugar
2 1/4 tsp instant yeast
3 1/4 cups plain flour + extra for work surface
2 tsp salt (I used salted butter so I reduced the quantity to 1 tsp)
1 tbs oil

Ingredients (filling):
100g dark baking chocolate
2/3 tsp ground cinnamon

Ingredients (coating):
1 1/2 cup light brown sugar
3 tsp ground cinnamon
100g unsalted butter


Method (dough):
(1) Adjust the oven rack to medium-low position and heat the oven to 100°C. Once the oven reaches the desired temperature, turn it off.

(2) Coat all sides of the bundt pan with the softened butter. Set aside.

(3) Mix the milk, water, melted butter, sugar and yeast in a cup.

(4) Mix the flour and salt in a large bowl.

(5) Make a well in the centre of the bowl and pour in the milk mixture.

(6) Using a wooden spoon, incorporate all the ingredients till a dough is formed.

(7) Turn the dough out onto a lightly floured work surface and knead for about 10 minutes until the dough is smooth and non-sticky.

(8) Coat the bowl with oil prior to placing the dough in it. Coat the surface of the dough with oil as well. Cover the bowl with a plastic wrap and place in the warm oven till it doubles in size. Takes approximately an hour.

Method (filling):
(1) Melt the dark chocolate.

(2) Add the ground cinnamon into the melted chocolate and mix well. Place the mixture in the refrigerator to harden it.

(3) Once the chocolate-cinnamon mixture is hardened (approximately 30 minutes), chop it into small pieces with a knife.


Method (coating):
(1) To brown the butter, heat it at medium-high heat in a saucepan. Once the butter turns light brown, remove it at once from the heat.

(2) Mix the brown sugar and cinnamon together in a bowl. Set aside.


Method (assembly):
(1) Remove the risen dough from the oven and bowl. Shape it into a large 8" x 8" square and divide the square into 64 equal pieces using a knife.

(2) Meanwhile, heat up the oven to 100°C and turn it off once the temperature is reached.

(3) Flatten each piece slightly and place some pieces of the chocolate-cinnamon mixture in the centre of the dough. Nip the edges together and roll it into a ball.

(4) Dip each dough ball first into the melted browned butter before rolling it in the bowl of brown sugar-cinnamon mixture.

(5) Place each dough ball in the buttered bundt pan and stack the balls next to each other leaving no gap.

(6) Place the bundt pan in the warmed oven for another hour. This is to proof the dough a second time until the dough balls are approximately an inch below the rim. Remove from the oven.

(7) Preheat the oven to 180°C and bake for ~ 30-35 minutes.

(8) Remove from the oven and cool for not more than 5 minutes before turning it out from the bundt pan.


Verdict:
(-) This recipe yields a very sweet bread - sweet on both the outside and the inside! Too sweet for my liking.
(-) Some suggestions to reduce the sugar level would be to use fine brown sugar and only coat the dough balls sparsely with it. Might also be an alternative to do away with the chocolate filling totally.
(-) Do not leave the monkey bread uncovered overnight as it'll turn quite hard by the following morning - as in my case. :(

(+) Although there are quite a number of steps, nevertheless, if you were to abide by these steps faithfully, I'm quite sure you'll end up with this interesting-looking bread to add to your baking book of conquest!

(=) Best to bake and finish this bread on the very same day! As such, it would be quite a good idea to make it for a children's party where all the kids would be busy nipping away at the small pieces of bread.

Wednesday, April 14, 2010

Gulasch

Gulasch is a traditional Hungarian dish but somehow made it into the list of traditional Austrian cuisine someway along it's long line of history. It is often served with semmel or semmelknödels in local restaurants of which I definitely prefer the former. The thick paprika and onion based soup with it's huge chunks of soft, well-stewed beef is good enough to win me over the first time I tasted it.

So on this fine Tuesday afternoon, having ran out of ideas on what to cook for dinner, I finally dug out my packet of "Knorr - Basis für Gulasch" from the depths of the kitchen cabinet and proceeded with my first attempt at Gulasch making. May The Force Be With Me!

Gulasch

Ingredients:
1 packet of "Knorr - Basis für Gulasch"
3/4l water
3tbs oil
1/2 onion - diced
1/2 red paprika - diced into cubes
300g beef chunks


Method:
(1) In a pot, add water and just prior to boiling, slowly stir in the contents of the Knorr packet.

(2) In another pot, add the oil and once it is heated up, stir fry the onions till it begins to brown slightly.

(3) Add the red paprika and continue to stir fry for a while more.

(4) Pour the Knorr soup mixture into the pot of stir-fried onions and paprika. Stir well.

(5) Add the beef chunks.

(6) With the lid half-covering the pot, allow the dish to simmer at low heat for 1.5hrs - 2hrs.


Verdict:
(+) It is so, so easy to recreate this traditional dish with the Knorr soup packet.

(=) A modern cooking twist to yield a traditional flavour!

Light Yoghurt Muffin

Light Yoghurt Muffin

Ingredients:
1 cup plain flour
1/3 cup sugar
3/4 tsp baking powder
3/4 tsp baking soda
1/4 tsp salt
1 egg
200g yoghurt (flavour of choice)
1 tbs oil
2 tsp lemon juice
1 tsp vanilla extract


Method:
(1) In a big bowl, mix together flour, sugar, baking powder, baking soda and salt.

(2) Make a well in the bowl and add in the egg, yoghurt, oil, lemon juice and vanilla extract.

(3) Stir the liquid mixture well before mixing in the flour mixture to just combine.

(4) Line the muffin pan with muffin cups and fill half of the cups with the batter. It is entirely up to the individual's creativity to add chocolate chips for chocolate filling muffins or crispy cereals to the batter for that added crunchiness or even a slice of banana to top the batter.

(5) In a preheated oven of 180°C, bake for 15 minutes or until a skewer inserted in the center comes out clean.


Verdict:
(+) A very easy recipe to assemble.

(=) Yields extremely light, healthy and guilt-free muffins with it's one tablespoon oil batter!

Genottenhöhe @ Villach

Overlooking the small town of Villach is Genottenhöhe, a traditional Austrian restaurant located on top of a hill. The walk up to the restaurant took us just 30 minutes from our apartment and it was a good form of exercise on a lazy Saturday afternoon.

The month of April is known to the locals as a moody month. It can be sunny one moment, windy the next and even raining or snowing on the very same day! On this particular Saturday, the sky was in a perpetual state of indecisiveness - to be a sunny or a cloudy windy day?

Hence we started the walk thinking that it'll be a sunny afternoon, only to return to the apartment shortly afterwards for a change of windproof tops. The walk uphill was rather gradual and enjoyable if not for the ocassional strong gusts of wind. Along the way, we found a hen wandering underneath some bushes and only realised that it must have gotten lost from its brood at a farm just a stone's throw away.

The restaurant has both indoor and outdoor seatings with a lush green field for children to ran about. If not for the windy conditions, we would have chosen to admire the view of the town from the outside with a nice brew of light Austrian coffee. Nevertheless, in the cosy interior, the view through the window was equally splendid.

Tuesday, April 13, 2010

Osteria Dal Conte @ Klagenfurt

Osteria Dal Conte is an Italian themed restaurant and it is the best one I could find in the Klagenfurt town centre!

I always find every visit to the restaurant packed full with customers and was even turned away on one occasion.

I first fell in love with the restaurant when I first patronized it on a Thursday evening and managed to find a seat next to the front door. On their menu, there would be the daily available dishes and one special dish for each day. It turned out that on that particular first visit, the Thursday special was seafood pasta in white wine sauce - my absolute favourite! The order was taken rather quickly and the food came within 15 minutes. The piping hot serving looked huge with plentiful quantities of shelled seafood topping the pasta. And it tasted so so good on that cold Autumn's evening. The seafood was fresh and the pasta was cooked to al dente perfection! I managed to wipe out the entire serving and was already looking forward to my next visit!

So needless to say, whenever I'm in Klagenfurt town centre, this restaurant would be my natural first choice. My recent visit was on a Friday late afternoon. Even at 6pm, most of the tables were already fully reserved and we were lucky to find one in the midst. I ordered the Friday special which was grilled fish with grilled baby potatoes coupled with vegetables. This was the first time I had a fish with both head and tail served to me in Austria. Very often, the fishes available in restaurants would either be in sections or in breaded fillets. The fish tasted fresh but could be better cleaned as there were still some scales on the skin, The vegetables were crunchy and potatoes excellently grilled that I can't seem to stop stuffing my mouth with it although my stomach is screaming *FULL*.

My companion ordered the other special for the day which was shell-shaped pasta in a cream sauce topped with bits of fresh seasonal mushrooms and deer meat. Simple as it look, it tasted fantastic! I couldn't stop forking at his plate even while I was already busy with mine. At a mere €6.50, this is definitely worth it!

The conclusion I drew from this recent visit was that their pasta is a must-try and certainly the safest option guaranteed to satisfy even the most fussy eater.

With good food at affordable prices, I am already looking forward to my next visit! :)

Tuesday, April 6, 2010

Easter Day

Easter Day or Easter Sunday is one of the most important festival for the Christian community. It celebrates the resurrection of Jesus Christ on the third day after his crucifixion on Black Friday or otherwise known as Good Friday.

Since the majority of Austrian are Catholics, the main town centres were spruced up with open-air Easter markets and theme-parks while many of the households were decorated with Easter ornaments - primarily with Easter eggs, Easter hens and Easter bunnies.
Even the pots of flowers or plants on sale in the florists were dotted with Easter decorations of one sort or another.
One of the most traditional practice during Easter would be to cook the eggs followed by the colouring of these hardboiled eggs. These eggs would then be distributed to relatives or even given away to customers in the shops or supermarkets.

For the first time, I was introduced to the Easter bread. It was essentially white bread with a slight tinge of sweetness and herb flavouring (which is optional) in it.

And not forgetting the all-important cake and coffee culture in Austria, or rather in my family. We had an Easter cake on Easter Saturday afternoon where it's the usual chocolate cake but on this very special occasion, it was decorated with green-coloured marzipan nests each with three colourful mini candy eggs on it. Cute!
The other highlight for me would certainly have to be all the Easter chocolates I received. They are all so nicely wrapped that it would be such a pity to open up the wrappings. So while I am still getting my daily chocolate fix from my other sources, the Easter chocolates are meanwhile safe in their pretty wrappings. :)

Mini Cottage Pies

Mini Cottage Pies

Ingredients (pastry for the tart):
2 cups plain flour
3/4 cup cold unsalted butter, cut into cubes
1 tsp salt (no need to add salt if salted butter is used)
6 tbs ice water (approximately)

Ingredients (meat filling):
250g minced beef
1 medium onion - finely diced
2 cloves garlic - diced
1 tomatoes - cut into cubes
1/2 cup water
1/4 cup frozed peas (add more according to your preference)
oyster sauce (season accordingly)
salt (season accordingly)
pepper (season accordingly)

Ingredients (mashed potatoes):
2 large or 3 medium potatoes
1/4 cup milk
1 tbs butter
1 egg yolk
dash of salt
dash of pepper

Method (pastry for the tart):
(1) Pulse in a food processor the flour, butter and salt until the mixture resembles a coarse meal with some small butter lumps.

(2) Drizzle some ice water evenly over the mixture. Pulse until incorporated. Squeeze a small handful of the dough. If it doesn't hold together, add more ice water, a little at a time and pulsing till combined. Do not overwork the dough or the crust will be tough.

(3) Turn the dough out onto a work surface and gather all the dough together. Flatten the dough and wrap it in plastic wrap. Chill till firm for at least 1 hour.

(4) Preheat oven to 180°C.

(5) Roll out the dough to ~0.3cm thickness and using a round cutter, cut out rounds and place the dough into muffin pans.

(6) Prick the bottom of the tart shells with a fork and bake till tart turns golden brown.

(7) Remove from the oven and let it cool.


Method (meat filling):
(1) Heat 1 tbs olive oil in a frying pan.

(2) Cook the onions and garlic till soft and lightly browned.

(3) Add in the beef, stirring until it changes colour.

(4) Add in the tomatoes, water and sauce.

(5) Bring it to the boil.

(6) Reduce the heat and allow it to simmer until all the liquid has evaporated.

(7) Stir in the peas and check the seasoning.

(8) Remove from heat.


Method (mashed potatoes):
(1) Boil the potatoes until soft. Remove and drain.

(2) Mash the potatoes in a large bowl.

(3) Stir in the butter, milk, yolk, salt and pepper till well combined.


Method (assembly):
(1) Put the pastry casing on a baking sheet.

(2) Fill it with the beef mixture and top it off with the mashed potatoes.

(3) Place them in the oven until the mashed potato top turns slightly brown.

(4) Serve warm.


Verdict:
(-) It can take quite a few hours from beginning to end for the completion of these mini pies

(+) The pastry recipe is extremely crispy and is highly recommended for use in other pie recipes, be it sweet or savoury.

(=) Although small in size, these mini pies are quite filling and definitely delicious!

Coming of Spring

You'll know that Spring is here when:

* Young buds start emerging from the earth and wild flowers can be seen blooming everywhere on the forest grounds.
* Pussy willows (银柳) began popping out from willow branches.

* Snow no longer covers the railway track

* Farm lands are plowed, getting ready for the next farming season
* Towns are again in the midst of green with snow-capped mountain peaks

Marbled Banana Chocolate Cake

Banana Chocolate Marble Cake

Ingredients A:
1/2 cup sugar
1/4 cup vegetable oil
1 egg
1/4 cup milk
2 bananas, mashed

Ingredients B:
1 cup plain flour
1/4 tsp baking soda
1/2 tsp baking powder
1/4 tsp salt

Ingredient C:
1 cube dark baking chocolate


Method:
(1) Preheat oven to 180°C.

(2) Spread some butter on the bottom and sides of baking pan before lining the pan with baking paper. Lightly grease the baking paper with the remaining butter. Set aside.

(3) In a big bowl, whisk together ingredients A.

(4) Add ingredients B and whisk well.

(5) Remove 1 cup of the batter and place it in another small bowl. Microwave ingredient C to melt it before adding it to the batter. Mix well.

(6) To create the marbling effect: Place a scoop of the white batter in the middle of the baking pan. In the middle of the white batter, pour a scoop of chocolate batter on it. Alternate between the two-coloured batters until all batters are used up.

(7) Bake for ~30 minutes or until a skewer inserted in the center comes out clean.

(8) Cool on a wire rack and store in an air-tight container.


Verdict:
(+) Extremely fast and easy to make

(=) The fragrance of the bananas makes it a hard-to-resist tea time snack.